
In Windows 10, whenever there is a new notification of any kind, it will be displayed to you as a toast notification via the Action Center. In fact, the Action Center will act as a central hub for all the notifications from the supported apps. Besides showing and storing the notifications in the Action Center, the default Action Center icon will be temporarily overlapped by the actual app icon that is responsible for the notification. This feature lets you quickly know which app sent the toast notification.
If you think this behavior is unnecessary or if you don’t want the app icons to overlap the notification icon, it is very easy to enable or disable Action Center app icons.
Enable or Disable Action Center App Icons Using Built-in Options
Windows 10 Action Center has built-in option to quickly enable or disable Action Center app icons. To disable Action Center app icons, simply right-click on the Action Center icon appearing on the bottom right corner of your screen and then select the option “Don’t Show App Icons.”
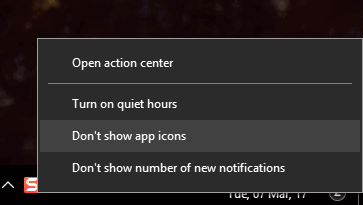
With the above action, you will no longer see any app icons overlapping the Action Center icon.
If you want to revert back, simply right-click on the Action Center icon and then select the option “Show App Icons.”

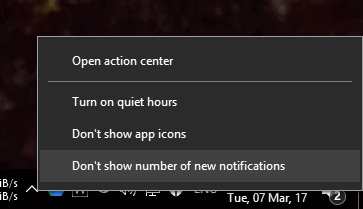
Additionally, you can also show or hide numbers for new notifications. To do that, right-click on the Action Center icon and select the option “Don’t Show Number for New Notifications.”
Enable or Disable Action Center App Icons Using Registry
Note: to make the required changes, we need to create and edit registry keys. So before proceeding any further, make sure that you have a good backup of the Windows Registry. This helps you to restore your system if anything bad happens.
Alternatively, you can also achieve the same by editing the Windows Registry. To start, press Win + R, type regedit and press the Enter button.
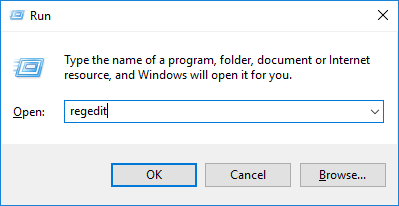
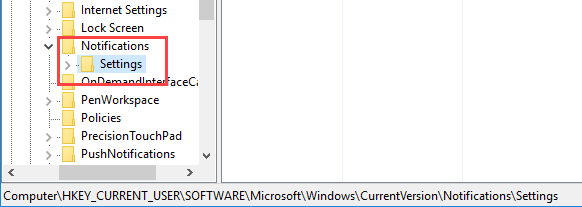
The above action will open the Windows Registry Editor. Here, navigate to the following location:
HKEY_CURRENT_USERSOFTWAREMicrosoftWindowsCurrentVersionNotificationsSettings
Right-click on the right panel, and then select the option “New -> DWORD (32-bit) Value.”
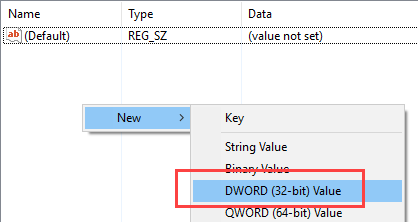
Now, name the new key as “NOC_GLOBAL_SETTING_GLEAM_ENABLED” and press the Enter button to confirm the name.

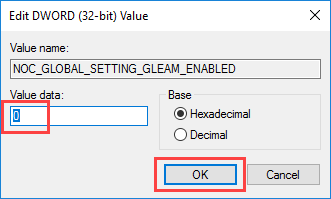
After creating the key, double-click on the newly-created value. Enter the Value Data as “0” and click on the “OK” button to save the changes.
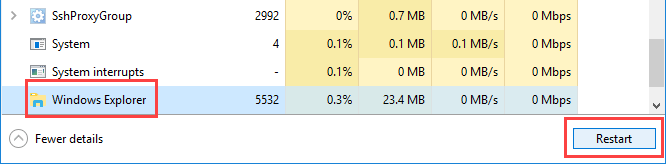
That’s all there is to do. Either restart Windows Explorer or restart your system to make sure that the changes take effect. To restart Windows Explorer, open the Task Manager, select “Windows Explorer” in the Processes tab, and click on the “Restart” button.
If you want to show the Action Center app icons, then simply delete the newly-created key and restart your system. This action will restore the previous behavior where the app icons overlap the Action Center for a fraction of a second.
Do comment below sharing your thoughts and experiences about using the above methods to enable or disable Action Center app icons in Windows 10.

Vamsi is a tech and WordPress geek who enjoys writing how-to guides and messing with his computer and software in general. When not writing for MTE, he writes for he shares tips, tricks, and lifehacks on his own blog Stugon.
Subscribe to our newsletter!
Our latest tutorials delivered straight to your inbox
Sign up for all newsletters.
By signing up, you agree to our Privacy Policy and European users agree to the data transfer policy. We will not share your data and you can unsubscribe at any time. Subscribe