How to Setup Remote Desktop on Windows 7 is simpler than you might think and can unlock powerful access to your networked devices. With Microsoft Remote Desktop Manager, you can connect to any computer within your network, giving you full access to files, applications, and resources just as if you were physically at that machine — no matter where you are.
To get started, you’ll first need to allow remote access on the workstation you want to connect to. If your version of Windows 7 doesn’t already include the Remote Desktop feature, don’t worry — the Standard Edition of the tool is available for free and is quick to download. It includes the essential features most users need for basic remote connections.
For those with more advanced networking needs, like VPN integration, an Enterprise version is also available, though it comes with a cost. Still, for most users learning How to Setup Remote Desktop, the free Standard Edition is more than sufficient.
In the guide below, we’ll walk you through How to Setup Remote Desktop using the Standard Edition — from downloading the software to configuring your system for secure and seamless connections. With just a few tweaks, you’ll be well on your way to accessing your home or office computer from virtually anywhere.
Don’t worry if this is your first time figuring out How to Setup Remote Desktop — the process is straightforward, and you’ll be reaping the benefits of remote access in no time.
Setup For Remote Desktop Connections
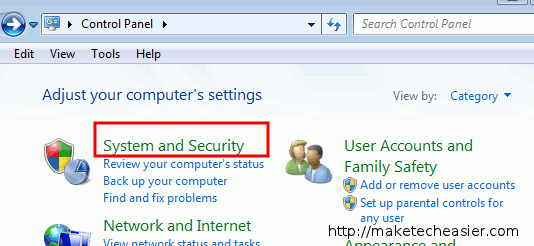
1. Go to the “Start -> Control Panel -> User Accounts (If they are enabled) -> System & Security”.
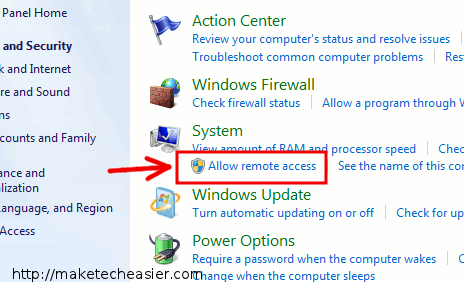
2. Under System, select the Allow Remote Access Tab.
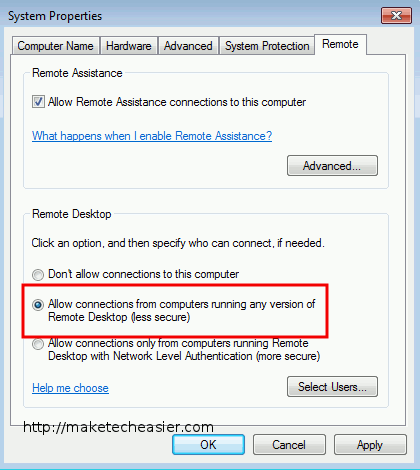
3. When you enable the Remote Desktop, you have two options:
- Select “Allow connections from computers running any version of Remote Desktop” and click Apply. This option is for having more than one version of Remote Desktop enabled.
- If you have a single version of Remote Desktop running, simply select the last option. “Allow connections only from computers running Remote Desktop with Network Level Authentication”
4. Click the “Select Users” button, followed by the Add button.
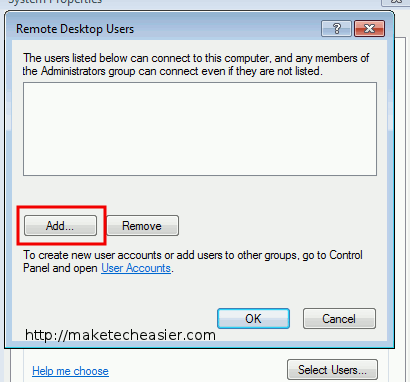
5. Next, we will select the users who will have access to the Remote Manager. Choose “Advanced -> Find Now”. A drop down list will be displayed where you can select the users, computer or domain name that can be granted access. Click on the name who will be given access and click OK to save your changes.
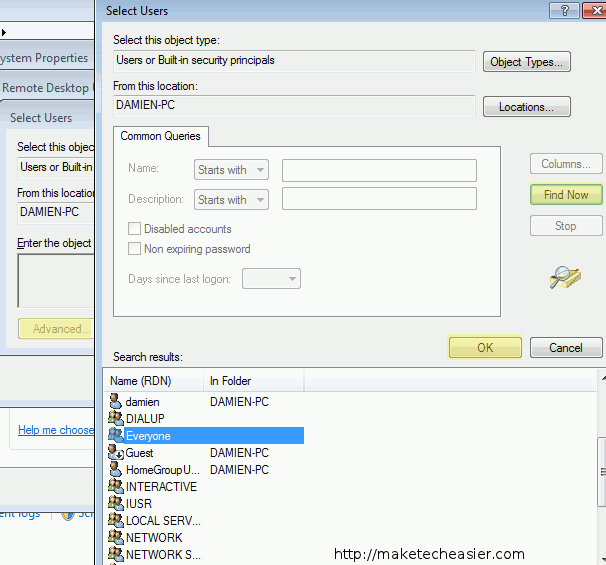
6. Click OK 3 times to exit all of the open windows and begin the Connection steps below.
Note: To revoke a users permissions to access Remote Desktop, select the account in the steps above, then select Remove.
Setup For Accepting Remote Desktop Connections
For an administrator to connect to your PC, they must have permission to access your computer. This is particularly helpful in a training situation and is often used for troubleshooting by a technician.
1. Set up access by going to the “Start -> Control Panel -> System -> Advanced System Settings”.
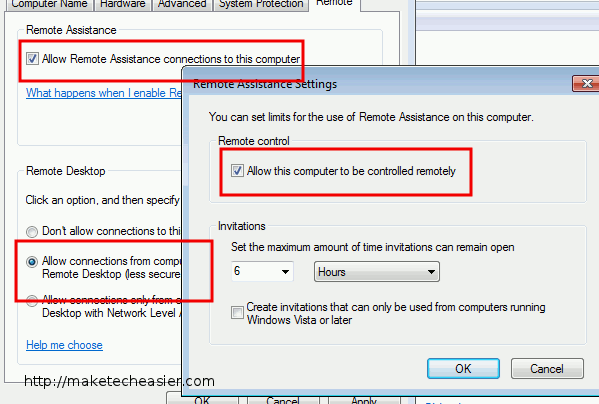
2. Select the Remote tab, then select the Allow Remote Assistance connections to this computer. At the bottom of the screen, select “Allow connections from computers running any version of Remote Desktop”. Lastly, select Advanced which will open a new screen. Select “Allow this computer to be controlled remotely” and press OK.
Note: Before you can connect to a Remote Desktop you will need to configure your Router and Firewall
- Connect behind a Router with a single computer – Configure your Router’s port forwarding to allow port connections on 3389 then type in your IP address supplied by your ISP.
- Connect behind a Router with multiple computers – For each computer you want to remotely connect to, you will need to configure each computer to listen to different ports to avoid port conflicts.
- If you have a Firewall running, you will also need to configure that to allow communication to the port you opened in your Router.
Connect To Your Remote Desktop
Now that you have done all the work to set up the Remote Desktop, you will only have to start at this step each time you want to access the computers in your network.
1. Go to the “Start -> All Programs -> Accessories -> Remote Desktop Connection”.
2. A box like the one below will open where you will enter the address of your remote computer. Click Connect to enter your credentials.

3. Entering your credentials at sign in, will connect you to the Remote Desktop where you can access the PC in your network.